Primitive Pleasures: what balanced out the rustic this month

There’s this blog that I really love called Cardigan Way. Katie, the lovely author behind the blog, and I connected over a shared love of Eustace from The Chronicles of Narnia. She is also a pastor’s wife, loves literature, and has a keen sense of style. As I was catching up with all the truth, goodness, and beauty on Cardigan Way the other day, I came across her January Goodness post and loved it. It’s a retrospective of what she’s been into for the past month.

Primitive Pleasures is the Primitive Roads take on a “what I’m into” post.  So, here goes a lot of good things that got me through the rustic moments of February…

Primitive Pleasures February

Homemade

February was my turn to provide a meal for the elder’s meeting at our church and Tim’s birthday, both of which gave me reasons to make cupcakes. I have 5 cookbooks specifically dedicated to cupcakes, but I went for recipes I’d made before from one of my favorite food blogs – Annie’s Eats. She makes a ton of delicious things, however, the cupcakes are unreal. {My photos don’t do them justice…}

Annie's Eats Cupcakes

One of the things Tim and I miss most about California is really good Mexican food. Since my word for this year is intentional, I decided to push past the intimidation and start making Mexican food at home. I’m addicted to bean and cheese burritos so my first project was refried beans. The first recipe I tried {Crockpot Refried Beans} was a huge success. We also enjoyed the Sweet Corn Chicken Enchiladas and Baked Tacos from One Good Thing.

Baking is an outlet for me and when it’s cold, it seems like I really need an outlet for my winter blues. I made Joy The Baker’s Biscuit Cinnamon Rolls twice, Rosemary Lemon Sugar Cookies, and Martha Stewart’s Cream Filled Chocolate Sandwich Cookies. Maybe my best baking discovery this month was the PERFECT chocolate chip cookie: Alton Brown’s Chewy – tender, chewy {because of bread flour} and chock full of chocolate chips. Just wow.

Cookies

Crafted

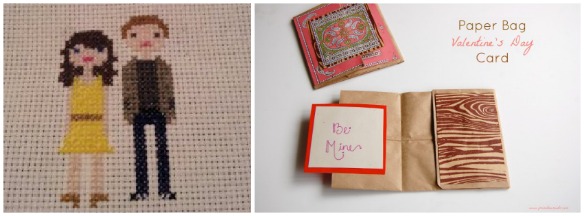
My friend Kristina is doing a month of craft therapy on her blog The Blissful Bird. She made the cutest cross-stitched likeness of her and her husband. I’m inspired to break out my needle and thread.

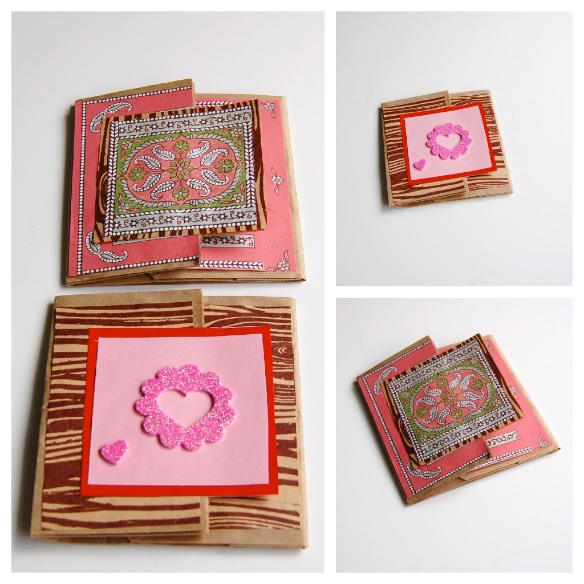
I made another version of the Paper Bag Christmas Card for Valentine’s Day {plus I made my first ever video tutorial} and then saw this Paper Bag Book variation and can’t wait to adapt it for upcoming holidays.

CraftedLovely Ideas

I’m spatially challenged, but my mom was able to replicate this awesome way to braid your scarf.

In and effort to fight back against the cold on a trip to Chicago last week, a friend and I held the first Humidity Saturday. We went to the Garfield Park Conservatory and enjoyed the warm, damp air, earthy smells, and greenery knowing it was below freezing just beyond the glass walls. I enjoyed it so much, I’m looking for ways to do it in Idaho. Even a day where you turn up the heat to 80 and wear shorts in your house would be a huge tre

Lovely IdeasRead

My new job offers me plenty of travel time to read. Some of my favorites from this month were Grace For The Good Girl by Emily Freeman, Losing It by Erin Fry, and Death Comes To Pemberley by P.D. James. {a note on that last one – not necessarily my favorite Jane Austen sequel, but worthwhile for the interesting way James developed the character’s life after Pride and Prejudice}

It’s fitting that I stumbled upon a couple awesome posts on marriage this month since 1. it’s the love month and 2. I was participating in a collaborative series called How To Maintain Your High Maintenance Marriage.

Closing Thoughts

The Lizzie Bennet Diaries. Enough said.

Downton Abbey as a Metaphor for Church Life by Adam McLane {who we are so excited to host at CBC in April!}

Speaking of good things to watch, it’s time for Psych Season 7 premiere! Time to sign off…

I’m linking up to What I’m Into at HopefulLeigh.

Paper Bag Valentine

VDay

Brown paper bags, aka the common lunch sack, are a combination of some of my favorite things: natural fibers, utility, and endless crafty possibilities.

I made Christmas cards from paper bags this holiday season and couldn’t wait for another occasion to create more. Valentines Day seemed like the perfect venue for a sweet, simple card.

VDay collage

Help your kids make a batch for classmates. Use them as place cards for a Valentines dinner party. Surprise your spouse with a gift card to a favorite store tucked inside.

Not only are the uses endless, the design is totally customizable. The look is totally up to you and your taste. Gather your paper scraps or go to a craft store to get a pack of matching scrapbook pa

VDay OpenMy favorite part of the design is the little pocket created by folding the bottom of the bag inward and gluing the sides. It’s the best little nook for a gift card or love note, even a mini Hershey’

VDay DimensionsPaper Bag Valentine’s Day Card

Here’s a list of dimensions for the paper scraps:

  • 1 (3″ x 4 3/4″)
  • 1 (2 3/4″ x 4 3/4″)
  • 1 (3 1/2″ square)
  • 2 (3 1/4″ square)

You’ll need:

  • Brown paper bag
  • Paper scaps – patterned or plain to your taste and design
  • Glue
  • Scissors

Instructions:

Please excuse the patch of carpet showing in the video – I’m new to this video thing :)

Refer to the Christmas Card post if you want written instructions.

Toilet Paper Roll Star

DSC_0482

Judging by the Paper Bag Christmas Cards I made earlier this week, I like to use household items to make pretty things.

Hang it on a tree, tie it on a package, or set it on a bookshelf.  However you display it, these stars (flower, maybe?) are lovely. and sparkly. and use book pages. and toilet paper rolls.

DSC_0487You’ll need:

  • 1 toilet paper roll
  • ruler, pencil, scissors
  • glue – preferably with a pointed applicator
  • 1-2 old book pages
  • glitter [optional]
  • button/pearl for the center [optional]

Toilet Paper Roll Star:

Flatten each roll and mark off 1/2″ segments along both sides of its length.

Cut across the roll using the marks as guidelines to make pointed oval (marquise) segments. You only need 6 pieces to create this star.  Use leftovers for more stars or some other crafty project.

Place a dot of glue about 1/8″ from the tip of one oval and press it into the same spot of another oval.  Wait 30 seconds or so for the glue to dry and continue the process until all the ovals are glued together (creating the star/flower shape).

As you continue to glue, the marquise shape will spread out to create the “petals”.  You may have to help them along a bit so they don’t tear apart.

Let the star dry while you work on the book page center.

Book Page Medallion:

My method for making the book page medallion was very experimental.  I’ll tell you how I did the one above, but would encourage you to check out any tutorial online for making paper medallions for a clear explanation of how you SHOULD make paper medallions.

I decided how wide I wanted my medallion and cut two strips of book page to that width.

Each strip was folded accordion style, about 1/4″ (ish) wide and then folded in half to create a middle crease.

The pieces of paper closest to each other in the crease were glued together, giving me two semi-circles of accordion book page.  Glue the semi circles together and voila!

starStar Construction:

I created a placket to attach the star and medallion because there are so many thin edges on both pieces.

Cut a square of card stock and glue to center of the star.  Glue the medallion to the card stock.

Use a toothpick to apply glue to random edges and sprinkle glitter liberally over the glue. Let dry for a minute then tap off excess glitter.  Tap over a piece of paper so you can recycle the glitter.

Add a button or pearl to the center.

photo (16)I tied mine on to a package of gingerbread granola for a hostess gift.

//pagead2.googlesyndication.com/pagead/js/adsbygoogle.js

(adsbygoogle = window.adsbygoogle || []).push({});

Paper Bag Christmas Card

Crystal Regan, our lovely and talented Director of Children’s Ministry, put together a festive spread for the December elder meeting last week.  Each place setting included one of these sweet Christmas Cards made from a brown paper bag and scrapbook paper.

I adore the creative construction and use of such a common household item  Plus, clever folding produces a little pocket for a gift card or personal note.

All you need is a lunch sack, paper, scissors, and glue.  I constructed a prototype with a smaller sized paper bag, so the folds are approximate.  The paper measurements are for Crystal’s card, above, which uses a standard brown lunch bag.  Adjust the paper size according to the size of your bag.

Paper Bag Christmas Card

You’ll need:

  • Brown paper bag
  • Paper scaps – patterned or plain to your taste and design
  • Glue
  • Scissors

Instructions:

Cut your paper scraps to the designated sizes indicated below (also in the photo above).

  • 1 (3″ x 4 3/4″)
  • 1 (2 3/4″ x 4 3/4″)
  • 1 (3 1/2″ square)
  • 2 (3 1/4″ square)

Fold the paper bag inward on the dotted lines shown above.  On the bottom part of the bag that was folded over, glue along the edges to create the pocket.

Use the photo below to guide you in gluing the decorative paper onto your bag.  The second  3 1/4″ square is glued on the inside of the front flap.

These cards are simple and would be fun to construct with kids.  Plus, the design is only limited by the event or your imagination.  Have fun – I would love to see or hear about your card creations!

Update: I made a video tutorial for creating a sweet Valentine’s Day version.


6 WAYS TO TRANSFORM TEA TOWELS

In my efforts to simplify and down-size while Tim and I were still in limbo, I went through my possessions (most of which were already boxed and waiting to find a home wherever Team Gardner settled down).  I was still finding things I could let go of after the third round of sorting and decision making.

One box in particular, however, gave me some trouble.  In lieu of the typical tchotchkes, I like to buy tea towels from places where I travel.  A year abroad combined with a love of linens left me with quite the collection – 35 tea towels to be exact.  (I have a problem…) Most are unused, treasured for the memories they conjure not their practical purpose.

In order to legitimize keeping this bountiful collection, I needed to start utilizing these towels.  Since every room in our new apartment does not need five or so hand towels stacked, folded, or hanging about, I looked to my favorite source of inspiration – Pinterest! – for some crafty ideas.


Here’s some easy projects I ran across that might help me put my collection to good use:

  • Cute tea towel pillow covers that require only basic sewing skills.
  • Give Fido something soft to chew on with this easy to make dog toy. Great project for recycling old or stained tea towels.
  • Shoe bag. Beach bag. Makeup bag.  This is truly a multipurpose carry-all.
  • I go through a journal in a matter of weeks, so buying fancy ones get a bit pricey.  Creating fabric journal covers out of tea towels helps beautify cheaper models.
  • Wrapping gifts is half the fun of giving them.  Use a tea towel to wrap up a gift and the recipient gets two gifts in one!
  • I adore the simplicity and ease of using tea towels to create cafe curtains or a valance.  Plus, you can quickly change them out for a different season or color scheme.

If you’ve repurposed tea towels, please share your project!