half-way healthy chocolate chip cookies

Half-way healthy Chocolate chip cookie

This was not the recipe I planned to share today, but when you have a (rare) baking experiment success, you change your plans immediately so other people can benefit. Plus, I’m in a celebratory mood because my little man turns one in a few days. Who doesn’t like to celebrate with cookies?

A recent Table Topics question revealed that both Tim and I have the same all-time favorite dessert… chocolate chip cookies! Not a huge surprise given the endless variations I’ve pinned on Pinterest and the fact that Tim has memorized the recipe for a single serving microwave cookie.

half-way healthy chocolate chip cookie

Our default cookie recipe is from my Auntie Lo. She concocted a recipe that makes a huge batch of soft, chewy cookies without fail. I introduced Tim to these dreamy cookies while we were dating and I now trust his AL Cookie making ability to let him make them himself (we’ve made them that often). But I digress from the cookie at hand.

We had a very savory dinner last night and wanted to cap off our night on the sweet side. Despite having just been to the grocery store, we didn’t have any Crisco (part of what makes AL Cookies so fluffy) so our default was out. I’ve been trying to eat as sugar-free as possible lately and have been waiting for an opportunity to try a less fatty mc fat fat cookie recipe.

half-way healthy chocolate chip cookie

I’m not anti butter but I remembered making coconut oil chocolate chip cookies last year and liking them, so I decided to start there. I love the precision required in baking. It’s part of the reason I prefer baking to cooking. If you follow the recipe, the product generally turns out perfectly. I’m not sure what happened last night, but I was making changes all over the place and *cue the angel chorus* the cookies turned out wonderfully!

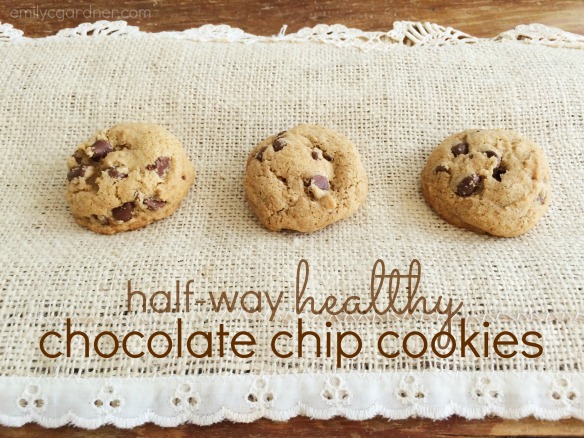
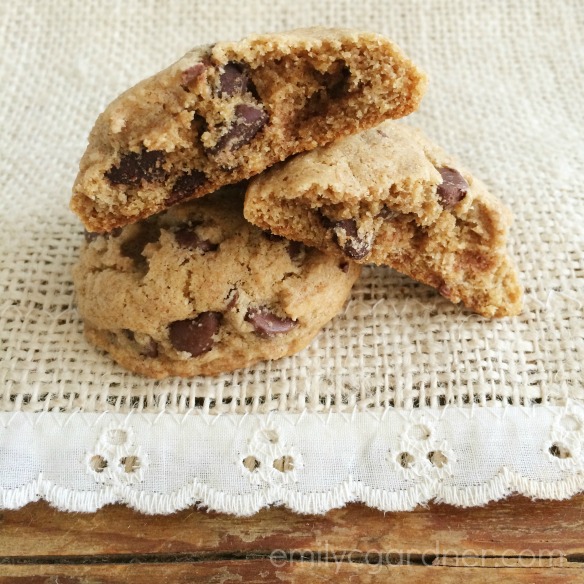
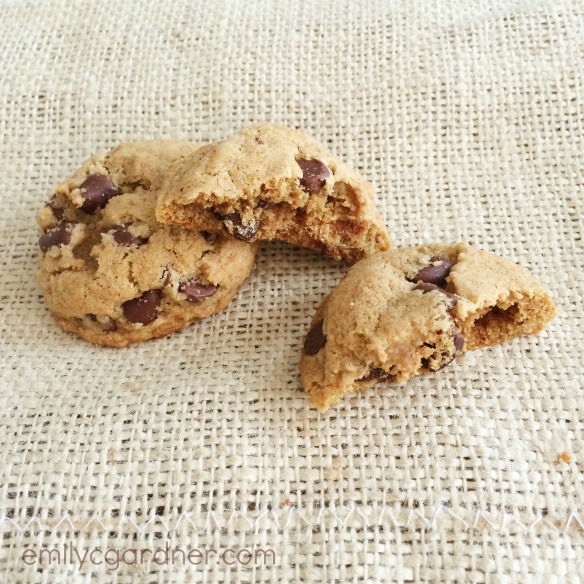
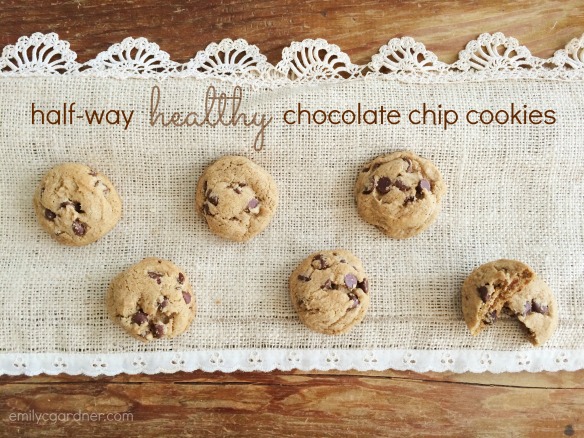
These cookies aren’t sugar-free, but they’ve earned the title half-way healthy because they are made with whole wheat flour and a nutrient dense fat. The cookies are soft and beautifully domed with a lightly crisp exterior.  Chocolate and the faint hint of coconut contrast perfectly with the warm brown sugar and nutty whole wheat flour.

half-way healthy chocolate chip cookieA note about the ingredients/tools:

  • Coconut oil – The benefit of having pantry storage that is the same temperature as the rest of our house is that my coconut oil stays in a soft, scoopable state. Make sure your coconut oil is room temperature ish, not melted.
  • Whole wheat flour – I’ve been baking with 100% whole wheat flour for awhile. I love the hearty taste, but for whole wheat newbies, it may be jarring when you don’t bite into a white flour cookie. Try white whole wheat if you want a more traditional white flour taste.
  • Milk –  I used 2% since that’s what we drink. Any type of dairy (soy, almond, whole) will work.
  • Cookie scoop – If you make cookies with any frequency, you NEED a cookie scoop. They insure consistent size and a nice domed top. I used a large cookie scoop for these cookies, 1.5″ in diameter.
  • Silicone baking mat – I love my Silpat. Even, non-stick baking at its finest.  Parchment is a good substitute.
  • AirBake cookie sheet – Just in case you were wondering what kind of cookie sheet I use….

half-way healthy chocolate chip cookie

Half-way Healthy Chocolate Chip Cookies
Author: Emily C. Gardner
Serves: 22-24 cookies
Soft, chewy chocolate chip cookies with the health benefits of whole wheat flour and coconut oil.
Ingredients
  • 1/2 cup coconut oil, softened but not melted
  • 2/3 cup packed brown sugar
  • 1 egg
  • 2 teaspoons vanilla extract
  • 1 1/2 cups whole wheat flour
  • 2 teaspoons cornstarch
  • 1 teaspoon baking soda
  • 1/4 teaspoon salt
  • 2 tablespoons milk
  • 1 cup (heaping) semi-sweet chocolate chips
Instructions
  1. In the bowl of a stand mixer, cream together the coconut oil, brown sugar, egg, and vanilla until light and fluffy.
  2. Add in the flour, cornstarch, baking soda, and salt. Mix until just combined. The dough will be a little crumbly.
  3. Add milk and chocolate chips. Mix until the chips are evenly dispersed.
  4. Scoop dough into balls using a large cookie scoop. Place dough balls on a plate. Put plate of dough balls in the freezer for 30 minutes.
  5. Bake frozen cookie dough balls at 350 degrees F for 11 minutes, util the edges are just turning golden brown. The tops will appear a little undercooked.
  6. Cool on baking sheet for 5 minutes (You will be tempted to do otherwise, but don’t skip this!) then move to cooling rack.
  7. Store in an airtight container.


Microwave Hot Fudge Sauce

Simple ingredients are transformed into a rich, thick fudge sauce using the convenience of a microwave. This is my comfort topping for anything ice cream related.

Microwave Hot Fudge Sauce

Please excuse the lack of food photography for this recipe post, but some things get consumed too quickly for me to style and shoot even just a few pics. This hot fudge sauce would definitely be one of those recipes.

Hot fudge sauce is classic. Like this particular sauce, the best kind is thick, deeply chocolatey, and simple. A good hot fudge sauce can turn any kind of ice cream or cake or pie (or spoon) into a decadent dessert worthy of company.

What makes this hot fudge sauce over the top is the method you use to make it. A microwave provides the hot in the hot fudge. It’s unfussy and quick – all good things when you’re bowl of ice cream is sitting out, waiting to be bathed in a fudgy pool of liquid chocolate.

Not convinced yet? Read my post over on Be. Mama. Be to find out why delicious simplicity isn’t the only reason I flip to this microwave hot fudge sauce recipe so often.

Microwave Hot Fudge Sauce
Author: Emily C. Gardner
A simple, classic hot fudge sauce made easy using the microwave. Your ice cream won’t know what hit it!
Ingredients
  • 2 ounces unsweetened chocolate
  • 2/3 cup evaporated milk
  • 1 cup granulated sugar
  • 2 tablespoons butter
  • 1/2 teaspoon vanilla extract
  • 1/8 teaspoon salt
Instructions
  1. Melt chocolate in a microwave safe bowl.
  2. Add evaporated milk and sugar to the chocolate.
  3. Stir until combined.
  4. Microwave for 2 1/2 minutes. (Keep your eye on the mixture. Depending on your microwave and bowl, it could boil over.)
  5. Remove from microwave and add butter, vanilla, and salt. Beat with a hand mixer until slightly thickened and smooth. Fudge sauce will thicken as it cools.
  6. Store in refrigerator if there are leftovers.

//pagead2.googlesyndication.com/pagead/js/adsbygoogle.js //

Strawberries and Cream Cupcakes

Strawberries and Cream Cupcakes

Pinterest is my favorite social media network. By far. In an effort to legitimize the time I spend on Pinterest, I’ve committed to be a doer, not just a pinner. I want to be crafty, save moneyhave fun with my kiddo, and make delicious food, not just pin those things.

Since I need (and love) to feed my family, making that delicious food I’ve been pinning has been an easy way for me to do, not just pin. I have quite the cookbook collection, but when I meal plan at the beginning of the week, I purposefully choose a recipe or two from one of my food boards to include. My favorite is when our small group needs dessert and I have an excuse to scour my cookies and sweets boards.

Though you can control the visual quality of your Pinterest boards, you can’t always control the quality of the finished product. Not everything I’ve pinned has been as good as it’s looked. I recently pinned a boxed cake cheat (how to make a boxed cake taste like a bakery cake) and made a mental note to test the claim ASAP. I got the chance a week or so later when Tim needed treats for a co-worker’s birthday celebration.

Pinterest tested
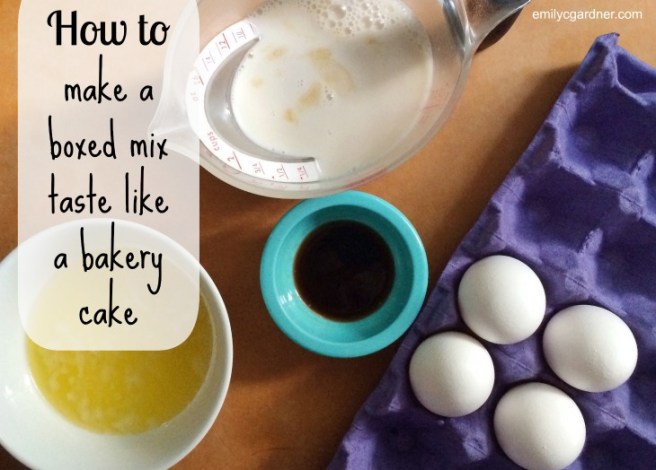
I made the suggested additions and substitutions – with a few tweaks of my own – and was super pleased with the results.

  • I buy cake mix when it’s on sale and usually have one or two in my pantry. I had one left – a Pillsbury Moist Supreme Classic White Premium Cake Mix.
  • I used 4 whole eggs instead of 3.
  • I didn’t double the amount of oil, but substituted 1/3 cup melted butter.
  • I used unsweetened almond milk instead of water. (Don’t be weirded out by the brown spots in my milk in the photo below. I dipped my teaspoon in the milk to get the excess vanilla off.)
  • Amen to the vanilla extract addition.
  • I had frozen strawberries on hand so I chopped up a few, tossed them in flour, and added them to the batter.
  • My oven is a bit unreliable, but I made an effort to preheat then reduce. Not sure if that actually happened.

boxed mix - bakery cake

There was still a hint of cake mix flavor (which doesn’t bother me), but the crumb was tighter and the cake itself was sturdier. Overall, this was a great way to amp up a pantry staple in a hurry. Pinterest success!

Beyond the method, these cupcakes were a flavor success, too. I’m a rule follower when it comes to baking, but I’m glad I threw in the strawberries on a whim. The butter makes these cakes quite moist and the fruit just adds a little burst of sweetness. I made a simple vanilla buttercream to top the cupcakes (not pictured), but they look so pretty unfrosted and taste delicious plain.

Strawberries and Cream Cupcakes 2

Strawberries and Cream Cupcakes
Author: Emily C. Gardner
A simple way to amp up boxed cake mix transforms classic white into strawberries and cream perfection.
Ingredients
  • 1 White Cake mix (Yellow or Devils Food would be delicious, too)
  • 4 eggs
  • 1 1/4 cup milk (whatever kind you have on hand)
  • 1/3 cup butter, melted
  • 1 cup frozen strawberries, diced
Instructions
  1. Preheat oven to 350 degrees F.
  2. Place contents of cake mix in a large mixing bowl. Add eggs, milk, and melted butter. Whisk until no (or very few) lumps remain.
  3. Sprinkle diced strawberries with a tablespoon of flour. Mix until all berries are lightly coated.
  4. Add coated berries and fold into cake batter.
  5. Scoop batter into muffin pan. Fill 3/4 of the way full.
  6. Reduce oven temperature to 325 degrees F and bake for 25 minutes.
  7. Allow cupcakes to cool in pan before removing.
  8. Serve plain or with vanilla buttercream frosting.

//pagead2.googlesyndication.com/pagead/js/adsbygoogle.js //

Low-Fat Banana Bundt Cake

Low-Fat Banana Bundt Cake

People get really loyal about their banana bread recipes. I’m no exception. I use my Auntie Lo’s recipe almost exclusively. However, there are times when branching out is a good thing. This Banana Bundt Cake is no exception. (I realize this is technically a cake, but it’s banana and you could bake it in a loaf pan, so it qualifies as a banana bread in my mind.)

When you’re a sweet toothed, carb addict who is trying to make wise food choices, low-fat and cake in the same recipe is a beautiful partnership. My mom had already vetted a couple muffin recipes from the Moosewood Restaurant Low-Fat Favorites cookbook I talked about in this month’s Twitterature post, so we were intrigued by the banana cake that fit that glorious description.

Many things can go wrong with low-fat baked goods. Some aren’t sweet enough (for me), others have a weird texture due to reduced amounts of butter and/or eggs. Some just have that “too-healthy” stank on them. But this dense, flavorful cake? None of the above.

Banana Bundt Cake Ingredients

Bananas and unsweetened applesauce add moistness to balance the reduced oil content. Brown sugar’s molasses undertones provide strong flavor and just enough sweetness to make this a viable dessert. The whipped egg white to egg yolk ration is perfect, cutting out some cholesterol while still maintaining a tight, rich crumb. I’m a sucker for anything with nutmeg (homey and festive, right?), and I loved how the unexpected spice in this cake made the banana flavor more complex.

Banana Bundt Cake Process

The recipe calls for baking in a Bundt pan (which is how I baked it), but my mom has made it twice in a 9-inch springform with great results. Slices of any shape are perfect for tucking into lunch boxes or nibbling on in the afternoon. I love mine with a plop of peanut butter and a cup of tea in the morning. But, it is a cake, so we’ve served it with a cloud of lightly sweetened whipped cream to rave reviews. I can also envision it with a dusting of powdered sugar and berries or a drizzle of homemade caramel sauce.

whipped cream

Whatever way you serve it, this Low-Fat Banana Bundt Cake is worth having in your banana repertoire. As with most banana baked goods, it tastes even better then next day.

Budget tips:

  • Unless your family eats a lot of unsweetened applesauce, buy a pack of the individual snack sized applesauces. You’ll have enough to make three cakes without worrying about the applesauce spoiling.
  • Buy overly ripe bananas instead of waiting for regular ones to get hinky. Grocery stores sell bags of brown bananas for cheap. You can even freeze mashed banana to use later (which is what you see in the photo of ingredients above).

Do you have a favorite banana baked good recipe?

Low-Fat Banana Bundt Cake

Banana Bundt Cake recipe

A dense and delicious banana cake for anytime of day! Adapted from Moosewood Restaurant Low-Fat Favorites: Flavorful Recipes For Healthful Meals

  • 2 1/2 cups unbleached flour
  • 2 teaspoons baking powder
  • 1 teaspoon salt
  • 1/2 teaspoon nutmeg
  • 3/4 cup brown sugar
  • 2 egg yolks
  • 1 cup mashed bananas
  • 3/4 cup unsweetened applesauce
  • 1/3 cup vegetable oil
  • 1 teaspoon vanilla extract
  • 4 egg whites

Preheat oven to 350 degrees F.

Lightly coat a 10-inch Bundt pan (or 9-inch springform) with cooking spray.

In a large mixing bowl, stir together the flour, baking powder, salt, nutmeg, and brown sugar. Mix well and set aside.

Combine the egg yolks, bananas, applesauce, oil, and vanilla. Add the banana mixture to the dry ingredients and stir just until evenly blended.

Beat the egg whites until stiff but not dry. Gently fold the egg whites into the banana batter with a spatula. Pour into prepared pan.

Bake for 60 minutes, until the cake begins to pull away from the sides of the pan and a knife inserted into the center comes out clean. Cool on rack for 10 minutes and then invert onto a plate.

Store in an airtight container.

Serves 16

Per serving: 140 calories, 3.5 grams protein, 5.8 grams fat, 18.6 grams carbs

//pagead2.googlesyndication.com/pagead/js/adsbygoogle.js

(adsbygoogle = window.adsbygoogle || []).push({});

Shauna Niequist’s Chocolate Mousse

Amazon Affiliate links included in this post.  If you click through to Amazonany purchase you make supports Primitive Roads (with no extra cost to you!)

Gathering

Sometimes good food photos just don’t happen. Despite the fact that I didn’t have time (or the lighting) to take pretty photos of this delicious dark chocolate mousse, the recipe needed to be shared.

Our Bread and Wine group/book club/study (not sure what to call it) met on Wednesday for another wonderful evening of fellowship around the table. I was in charge of the sweet ending to our Italian meal. My default desserts are generally heavy on the gluten, which doesn’t work for a couple of wheat intolerant gals, so I was going to go with sorbet to finish off the evening until I perused the recipe index of Shauna’s book.

GatheringI love meeting and eating around the (mismatched) table with these women!

Just the name, Simplest Dark Chocolate Mousse, had me convinced, then I looked up the recipe and was further convinced by the short ingredient list: dark chocolate, honey, and heavy whipping cream. Not only was this absolutely gluten-free, but it was easy too!

The honey offered a pleasant sweetness to the mousse but didn’t compete with the intense chocolate flavor. If you weren’t a huge dark chocolate fan, milk chocolate would certainly work.

A dollop of freshly whipped cream is the perfect foil for such a rich dessert. I waited until just before serving to add big clouds of lightly sweetened whipped cream to the tops of the mousse. The chilled mousse has a fudge-like consistency. If you wanted a lighter texture, take the mousse out of the refrigerator 30 minutes before serving.

I doubled the recipe to feed our 10 person group and had one serving left over to feed my hubby after youth group. Shauna suggests putting the mousse in juice glasses, but I don’t have 10 of any type of glass except for mugs and tea cups. So, I opted to serve the mousse in my pretty tea cups.

Mousse in tea cups

My baking sheet isn’t the prettiest background but worked well to corral all of these tea cups in the fridge.

Simplest Dark Chocolate Mousse

         adapted from Bread and Wine by Shauna Niequist

  • 1 quart chilled heavy cream, divided
  • 2 (12 oz) bags dark chocolate chips
  • 1/2 cup honey

In a saucepan over low heat, stir together 1 1/2 cups cream, chocolate chips, and honey until melted and smooth. Set aside to cool.

While the chocolate mixture is cooling, beat 1 1/2 cups cream to soft peaks in the bowl of an electric mixer. Fold cream into chocolate mixture in two additions.

Divide mousse among 12 glasses or ramekins (or teacups!). Refrigerate until set, about two hours.

Before serving, beat the remaining cream to firm peaks. (I always add some vanilla and powdered sugar to the cream intended for whipped cream). Spoon whipped cream on top of each mousse.

Serve plain or with berries.

Yield: 12 servings

//pagead2.googlesyndication.com/pagead/js/adsbygoogle.js

(adsbygoogle = window.adsbygoogle || []).push({});