Toilet Paper Roll Star

DSC_0482

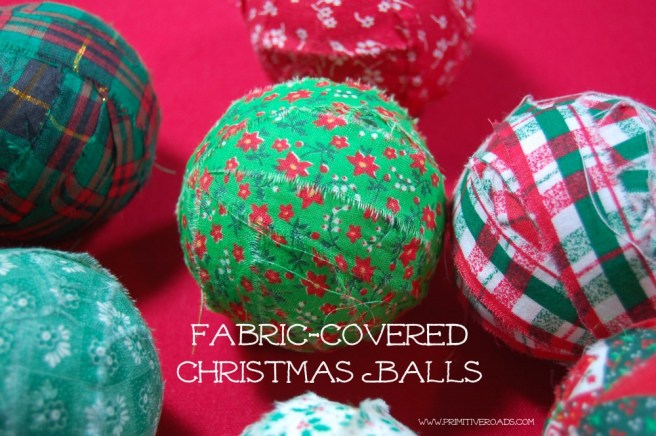
Judging by the Paper Bag Christmas Cards I made earlier this week, I like to use household items to make pretty things.

Hang it on a tree, tie it on a package, or set it on a bookshelf.  However you display it, these stars (flower, maybe?) are lovely. and sparkly. and use book pages. and toilet paper rolls.

DSC_0487You’ll need:

  • 1 toilet paper roll
  • ruler, pencil, scissors
  • glue – preferably with a pointed applicator
  • 1-2 old book pages
  • glitter [optional]
  • button/pearl for the center [optional]

Toilet Paper Roll Star:

Flatten each roll and mark off 1/2″ segments along both sides of its length.

Cut across the roll using the marks as guidelines to make pointed oval (marquise) segments. You only need 6 pieces to create this star.  Use leftovers for more stars or some other crafty project.

Place a dot of glue about 1/8″ from the tip of one oval and press it into the same spot of another oval.  Wait 30 seconds or so for the glue to dry and continue the process until all the ovals are glued together (creating the star/flower shape).

As you continue to glue, the marquise shape will spread out to create the “petals”.  You may have to help them along a bit so they don’t tear apart.

Let the star dry while you work on the book page center.

Book Page Medallion:

My method for making the book page medallion was very experimental.  I’ll tell you how I did the one above, but would encourage you to check out any tutorial online for making paper medallions for a clear explanation of how you SHOULD make paper medallions.

I decided how wide I wanted my medallion and cut two strips of book page to that width.

Each strip was folded accordion style, about 1/4″ (ish) wide and then folded in half to create a middle crease.

The pieces of paper closest to each other in the crease were glued together, giving me two semi-circles of accordion book page.  Glue the semi circles together and voila!
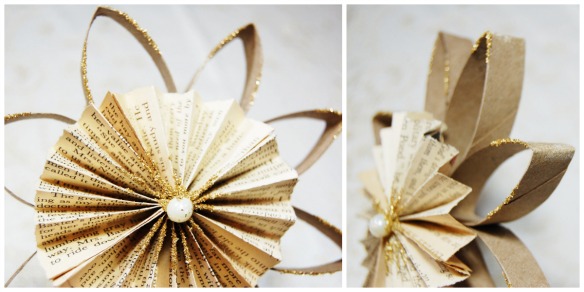
starStar Construction:

I created a placket to attach the star and medallion because there are so many thin edges on both pieces.

Cut a square of card stock and glue to center of the star.  Glue the medallion to the card stock.

Use a toothpick to apply glue to random edges and sprinkle glitter liberally over the glue. Let dry for a minute then tap off excess glitter.  Tap over a piece of paper so you can recycle the glitter.

Add a button or pearl to the center.

photo (16)I tied mine on to a package of gingerbread granola for a hostess gift.

//pagead2.googlesyndication.com/pagead/js/adsbygoogle.js

(adsbygoogle = window.adsbygoogle || []).push({});

Fabric-Covered Christmas Balls

DSC_0504Since you have your fabric stash out after making some Christmas garland, why not use it to make these decorative fabric-covered Christmas balls?

  • Rip fabric into strips about 1/2″ to 1″ wide. The length doesn’t matter too much, but the longer they are, the less glue you will have to apply.
  • Use a dot of glue to secure one end to a styrofoam ball.
  • Wrap fabric around the ball until all the styrofoam is covered.
  • Cut excess fabric off and glue the fabric end to the ball.

The method is simple and can be repeated on different size balls (which can be found at craft supply stores).

My fabric-covered balls are in a ceramic bowl on the coffee table. Using the same fabric patterns as the garland ties the colorful decor together, creating nice Christmas cohesiveness in your house.

balls

//pagead2.googlesyndication.com/pagead/js/adsbygoogle.js

(adsbygoogle = window.adsbygoogle || []).push({});

Christmas Garland

DSC_0323I inherited my Gramma’s sewing skills.  In other words, I can sew straight lines and that’s about it.  I look up the directions for threading my little, purple sewing machine every time I sew something.

I saw some adorable fabric scrap bunting on Pinterest a couple months ago and immediately saw visions of this Christmas garland in my head.  Even my basic sewing skills wouldn’t keep me from making this vision a reality.  Heck, even hand-stitching would be an acceptable, albeit slower, option for those who are completely allergic to sewing machines.

DSC_0317Twine seemed like a sturdy stringing option and I always have a spool on hand.  My mom, creator of my beautiful wedding ornaments, brought her stash of Christmas fabric when she visited last month.  We ended up making three garlands.

The process is simple.

  • Create a template with the size flag (for lack of a better descriptor) you’d like.  Mine are 4″ wide and 6″ tall (with the triangle point coming up about 1 1/2″ from the bottom).
  • Cut, cut, cut! Fold your fabric to cut out more than one at a time. Vary the fabric to your taste.
  • Fold down the top edge to create a 1/4″ opening.  Iron the flags and the fold.

DSC_0308Now, the sewing part.  I’ll admit it.  My mom did all the sewing, which turned out great because my sewing machine had some needle issue that would have made me throw it all out the window before I got even one hem sewn on these cute flags.

  • Sew along the raw edge of your fold.
  • Keep feeding your flags through the sewing machine, until all of the hems are closed. You’ll end up with a string of flags connected by thread.
  • Cut each flag from the thread string.
  • Arrange the flags in a fabric pattern you find aesthetically pleasing.
  • Use a paper clip or safety pin  to pull twine through each flag.

DSC_0313Spread the flags out along the twine and hang the garland.  Stand back and admire your handiwork!

I draped mine behind the couch to give our normal display some Christmas cheer.  I sent one to my sis and bro (in-law) and they hung it on a mirror in their dining room.

I love the folky aspects of this garland – no need to have clean edges or cookie-cutter flags.  The imperfections add to it’s primitive charm.

DSC_0321

Wedding Christmas Ornaments

I am definitely one to attach sentiment to objects.  I have several shoe boxes full of birthday cards because throwing them away feels like throwing away the person who gave it to me. After reading books like 7 and Organized Simplicity, combined with the hassle of packing and moving, I’m learning to separate sentiment from tangible items.

My wedding was the perfect test for this resolve.  The decor was so intentional, and full of me and Tim, that it was virtually impossible to separate sentiment from all the little details. Throwing them away wasn’t an option. Many of the decorations now spruce up our apartment.

The floral aspects were a different story.  Flowers are difficult to preserve.  My bouquet was gorgeous, but the dried version was uninspiring and sat on my parent’s porch for months after the wedding.  I thought that was the end of the road for my wildflower and twine spray until my mom visited over Thanksgiving.

She brought a special, handmade gift full of sentiment and love.  My mom crafted two ornaments from wedding decor so that the memories could hang on our Christmas tree year after year.

One ornament is filled with dried flowers from my bouquet, the other is filled with miscellaneous wedding ephemera (I love that word…). She used clear, plastic ornaments from Michaels, which come in multiple shapes and sizes.

Each ornament top was wrapped with twine that had previously been wrapped around the base of my bouquet. My mom’s first married Christmas tree was decorated with red gingham bows so she also fashioned me a bow from the extra twine to put on my first married Christmas tree.

Pieces of tea-stained doilies, fabric, tulle, lace, and tiny birds punched out of blue card stock mirror the decor detail from our wedding.

An ornament is the perfect way to preserve special memories and details.  The stuffings are free, the ornaments are inexpensive, and the sentiment will be cherished every year.

Paper Bag Christmas Card

Crystal Regan, our lovely and talented Director of Children’s Ministry, put together a festive spread for the December elder meeting last week.  Each place setting included one of these sweet Christmas Cards made from a brown paper bag and scrapbook paper.

I adore the creative construction and use of such a common household item  Plus, clever folding produces a little pocket for a gift card or personal note.

All you need is a lunch sack, paper, scissors, and glue.  I constructed a prototype with a smaller sized paper bag, so the folds are approximate.  The paper measurements are for Crystal’s card, above, which uses a standard brown lunch bag.  Adjust the paper size according to the size of your bag.

Paper Bag Christmas Card

You’ll need:

  • Brown paper bag
  • Paper scaps – patterned or plain to your taste and design
  • Glue
  • Scissors

Instructions:

Cut your paper scraps to the designated sizes indicated below (also in the photo above).

  • 1 (3″ x 4 3/4″)
  • 1 (2 3/4″ x 4 3/4″)
  • 1 (3 1/2″ square)
  • 2 (3 1/4″ square)

Fold the paper bag inward on the dotted lines shown above.  On the bottom part of the bag that was folded over, glue along the edges to create the pocket.

Use the photo below to guide you in gluing the decorative paper onto your bag.  The second  3 1/4″ square is glued on the inside of the front flap.

These cards are simple and would be fun to construct with kids.  Plus, the design is only limited by the event or your imagination.  Have fun – I would love to see or hear about your card creations!

Update: I made a video tutorial for creating a sweet Valentine’s Day version.